

T Shirt Design Video Tutorial
Did you know you can use Photoshop for designing T-shirts? In this Adobe Photoshop T-shirt design tutorial, we'll learn to create a typographic T-shirt design—how to design your own T-shirt with type! We'll experiment with different fonts, touch on some of the principles of design, and even use some Smart Objects! In my design, I'll be designing a shirt for Spirit Day, an anti-bullying campaign in support of LGBTQ+ youth.
What You'll Learn in This Adobe Photoshop T-Shirt Design Tutorial
- How to start a typography T-shirt design
- How to create a typography T-shirt design
- How to apply a T-shirt design to a mockup
What You'll Need
I used the following assets for this typography T-shirt design project:
- Avaline Script Sketch Font
- Routhers Retro + Extrude Font
- Summer Handwriting Font
- Doodle Flourishes
We're also going to take a look at Placeit, a fun and user-friendly T-shirt design maker. Sometimes, I just like to play with designs on Placeit—it's fun to experiment with mockups.
It's not just about mockups, however—it's a T-shirt design maker too! Whether you're looking for a T-shirt design template, cute T-shirt designs, or you just want to experiment right in your browser, Placeit's fun and easy to use.


Ready to explore how to make T-shirt graphics on Photoshop, use mockups, and experiment with some type? Let's get started!
1. How to Start a Typography T-Shirt Design
Step 1
For this tutorial, I'm going to design a shirt for Spirit Day, an anti-bullying campaign supporting LGBTQ+ youth. So I already know that I want to use purple in my design. I'm going to make things type-based, so legibility is going to be important for this project too. I'm also going to limit my colors, not only so the emphasis can stay on the purple, but so my project is more appropriate for screen printing.
It's a good idea to create T-shirt design ideas right at the start, so you have a road map in mind! Design your T-shirt in a way that meets your design and project goals.
It's easy to use Photoshop for designing T-shirts, so I'll be using it for my design. Let's go ahead and start up a New Document.
I'm going to work at a Width of 700 px and a Height of 1200 px, so it's largely the length and width of the front of my T-shirt.
Note, it's a good idea to ask your printer about size requirements—they could vary depending on a bunch of factors, like the style of shirt! Take the measurements in this tutorial as an example and not as the only possible solution as you begin to design your T-shirt.


Step 2
Before we create our document, let's take a moment to talk about resolution.
Generally speaking, I tend to work at 300 pixels per inch for a project like this. This is a relatively high resolution, appropriate for printing—as opposed to something like 72 pixels per inch, which would be more appropriate for a low-resolution project, like something for the web.
Again, if you're not sure, ask your printer—they should be able to help. When in doubt, I usually work large. When working with raster artwork, I'd rather work too big and be able to scale down than work too small—and then I can't easily size up without losing quality.


Step 3
One last thing, before we create our document.
In your document setup, look for the Background Contents dropdown menu. We want to select Transparent from this list.
Once you're happy with your document settings, click Create.


2. How to Create a Typography T-Shirt Design
Step 1
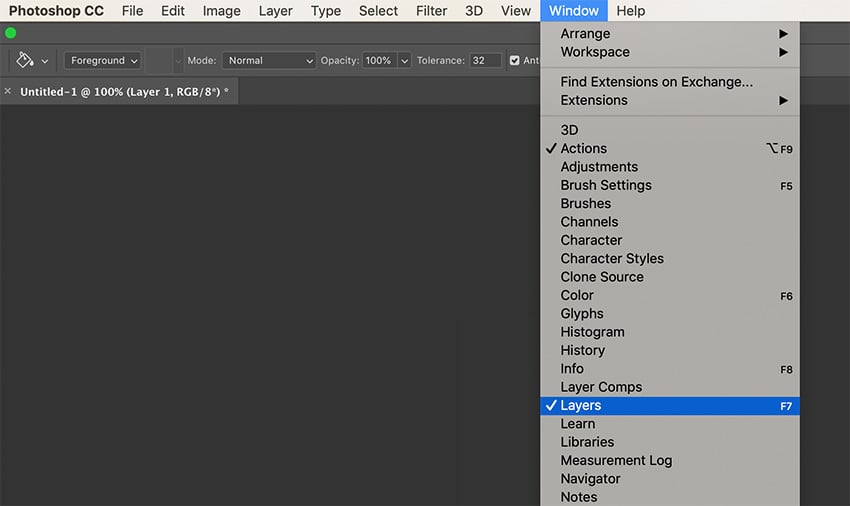
Now that we've set up a proper document, let's start the T-Shirt design with text only. First, let's take a look at our Layers panel. To open up the Layers panel, go to Window > Layers. You know a panel is open if you see a checkmark next to it here in the Window menu.


Step 2
So, looking at our Layers panel, we have one layer here, and it's transparent.
Note that Photoshop visually depicts transparency as this gray checkered pattern.


Step 3
Use the Paint Bucket Tool to apply a background color. I'm going to make mine purple because I know I'm designing for a purple shirt. Don't worry if you change your mind or you'd like to try out other colors. For now, just choose the color you'd like as your initial "shirt color".
I named this layer T-Shirt Layer. To change a layer's name, just double-click on the name in the Layers panel and type to rename.


Step 4
Now, let's lock this layer. Click on the Lock All icon, within the Lock Options in the Layers panel.
This will protect this layer—so we can't accidentally change it, for now.


Step 5
This T-Shirt design using Photoshop now needs fonts! I'm going to use more than one in my design.
How many should you choose? Which ones are the best for the job? There's no wrong answer—but here are a few of my recommendations.
It's likely a good idea to choose fonts that complement each other. For example, I think I want to try out a hand-drawn look and feel, so I'm going to try out a couple of different fonts that work with this aesthetic.


Step 6
Using the Text Tool, experiment with adding type to your composition. Just select the tool and then click on your canvas. You'll notice that Photoshop creates a new Text Layer for you—and you can begin typing.
I'm using the Routhers font to begin my composition.


Step 7
Note, you don't have to have all of your text on one layer—in fact, it's probably advantageous if you don't! I'm deliberately putting different bits of text on their own layers, so it's easier for me to move, change, and manipulate these pieces independently.
If you're unsure how to do this, you can Create a New Layer in the Layers panel—just click the New Layer icon, at the bottom. Then, proceed to use your Text Tool.


Step 8
However, you can also easily create a new Text Layer by clicking with the Text Tool on your canvas—where there isn't already text. It's another way of doing the same thing—your choice on this!
I've continued to lay type out in my work area. Nothing here is set in stone, so have fun with it! Experiment! I wanted the words "Spirit" and "day" to flow together, so I experimented with laying them out together.


Step 9
Our text-only T-Shirt design is coming together. Let's take a look at our Characters panel. If you don't see it, go to Window > Character.
From here, we can change a whole host of type options, like the font itself, its size, and its weight. To change the text properties on a text layer, simply select the text layer and then make your desired changes in the Characters panel. You can also find these options at the top of your screen, in your Options panel, with the Text Tool selected.
To edit the text itself, select your Text Tool and then click on the type.
Here, I've continued to lay out what I'd like my T-shirt design to say, applying different fonts at different sizes.


Step 10
Let's take a moment to talk about emphasis in this T-Shirt design using Photoshop.
This refers to a focal point or a key place in the composition that commands the viewer's attention. So, for example, looking at my composition, I decided to add extra emphasis to the words "Spirit Day" by adding a decorative stroke.
This font, Routhers, has an Extrude style that makes this super easy! All I had to do was duplicate my text layer and set the copy to Extrude in the Character panel. Then, I filled in any remaining gaps that revealed the background color with the Brush Tool, on a New Layer.
Remember: you can rename your layers by clicking on the name. I often do this for organizational purposes, so I don't get lost in a big pile of layers!
In addition, I made the other parts of my text smaller. Notice how the words "Spirit Day" really command our attention—because it's larger and the white has a lot of contrast here.


Step 11
My text-only T-Shirt design was off to a good start, but I felt that the type still looked rather disjointed. I wanted to experiment with movement—another principle of design. Maybe I could make the text "flow" in a way that was inspired by my emphasis.
I thought I'd experiment with making "Should Be" flow around the top of the "S" in "Spirit".
To do so, I started with Photoshop's Warp Text tools. With the Text Tool selected, click on the Create Warped Text button, up in the Options panel.
This brings up the following dialog box. I went with an Arc with the Bend set to 66. Notice how we get to see a live preview of our work!


Step 12
But the result still looks kind of clunky to me. I want something that flows in a more organic way, as if I'd hand-drawn it to wrap around the text (kind of 70s inspired, isn't it?).
To do so, I changed this text layer to a Smart Object.
Right-Click (on PC) or Control-Click (on Mac) on the layer you'd like to convert to a Smart Object. Then choose Convert to Smart Object, from the menu.


Step 13
Next, with that same layer still selected—it's a Smart Object now—go to Edit > Transform > Warp.
We're going to warp the text and shape it around our "S".


Step 14
Now, I can really dig in here and distort my text any way I'd like. Use the different resize handles to distort and shape the text.
This is what it looks like when the Warp is active. Once you're happy with your changes, simply hit Enter or Return.
Again, I wanted mine to be directly inspired by the shape of the "S" in "Spirit".


Step 15
Next, I repeated that same process with the word "Everyday"—but without the Arc.
So, let's do it again! First, I converted the Text Layer to a Smart Object.


Step 16
Then, I went to Edit > Transform > Warp, to bring back those resize handles, and I distorted my text.
Again, my goal was to make this supplemental text "flow" in a way that was inspired by my emphasis—my focal point.
Once you're happy with any edits made while warping your content, hit Return or Enter to finalize them.


Step 17
To tie the typography T-Shirt design together, I decided to add some decorative flourishes, inspired by the shapes I've been working with here. Again, I wanted things to move and flow together.
Here are the flourishes I used, if you'd like to try them too! I copied and pasted the flourishes into my document, each on its own layer.
I also made my flourish layers purple for organization purposes. You can do that, too, by right-clicking (on PC) or Control-clicking (on a Mac) on the layer, and then selecting the color you'd like from the menu. Again, this is optional and for organizational purposes only.


Step 18
Finally, let's test our design out on some different colored T-shirts. Right now, my "T-shirt color" is a mid-purple. Just unlock this layer and use the Paint Bucket Tool to test out different colors. Here's my design with a lighter purple.
Remember, you can change your Foreground Color in the Tools panel!


3. How to Apply a T-Shirt Design to a Mockup
Step 1
Before we move on and test out our T-shirt design on a mockup, make sure to save your work. I always try to save my work with all of my layers intact—just in case.
I recommend saving your work as a PSD file (a Photoshop file), so you have that raw, layered file to come back to and edit if you need to. We're going to merge our layers, so let's stop to save (File > Save) before we proceed!
Side note—I want to stress that it's important to ask your printer about file requirements and specs! We're going to walk through applying our design to a mockup here, but your requirements for your project might vary.


Step 2
Now, let's delete our background layer—the one where we have a fill color. To do so, select this layer and then click on the Trash Can in the Layers panel.


Step 3
Now, we need to merge our layers. Go to Layer > Merge Visible to merge all of your visible layers.
You'll see now, in the Layers panel, that you only have one layer, containing all of your work. You'll notice that the background looks like a checkered pattern—again, this is how Photoshop indicates transparency.


Step 4
Now, let's save our image as a transparent PNG file. To do so, go to File > Save As.
WARNING: DO NOT go to File > Save! This will overwrite your previous, layered work.
Choose PNG as your file format.


Step 5
Next, we see some PNG export options. I chose the largest file size. Click OK once you are happy with your selections.


Step 6
Now, let's test out our design! I'm going to try doing so with Placeit's T-shirt design maker because it's a really straightforward tool for testing out designs. But Smart Templates aren't just easy to use—they're fun too.
If you'd like to follow along, you can join me on Placeit!
For now, let's just mouse over Mockups and then choose T-Shirt!


Step 7
We could go ahead and upload right away, but I'm going to choose a specific mockup to test out first. I chose this one!
You can change the color of the model's shirt on the right-hand side of the screen. I chose a purple color because that's what I intended for my design. You can customize the background color too! I chose a lighter purple, but you could choose any color you like!
Now, just click to upload your imagery—the upload button is on the right-hand side.


Step 8
Next, we can crop and adjust our Photoshop T-Shirt design, before it gets placed on the mockup. It's super easy! When you're happy with your work, just click Crop.


Step 9
Voila! We have a cool mockup, where we can see our custom Spirit Day T-shirt design in action! I like to see my work like this, so I can get a feel for how it's going to look when someone's wearing it. It's also really fun to see it in action on different models!


Your Spirit Day Photoshop T-Shirt Design Is Ready!
Thank you for exploring some typography T-shirt design concepts with me! Now you know how to make T-Shirt graphics on Photoshop, and how to use a T-Shirt design maker. I hope you create some beautiful, type-inspired designs of your own!
Typography is just one of many T-shirt design ideas you could use when you make your own T-shirt design—the sky's the limit! Hopefully, you now have some extra inspiration and insight into T-shirt design using Photoshop. Thanks for reading, and happy creating!


I'll be going purple on Spirit Day, to support LGTBQI+ youth—but bullying and harassment are problems to recognize and confront year-round. If you or someone you love is struggling with harassment, bullying, or a harmful situation, please reach out to someone you trust. You deserve to be safe and treated with respect—likewise, maybe we can put some of that positive energy out into the world for others, too.
Thanks for reading!
If you enjoyed this Adobe Photoshop T-Shirt design tutorial, here are some others you might enjoy!
T Shirt Design Video Tutorial
Source: https://design.tutsplus.com/tutorials/how-to-create-a-typographic-t-shirt-design--cms-33941
Posted by: mcclainrisfy1972.blogspot.com
0 Response to "T Shirt Design Video Tutorial"
Post a Comment